A blog about technical knowledge.

Breaking

Wednesday, 10 January 2018

January 10, 2018

How to create a new post in Blogger


how-to-create-new-post-in-blogger-blog


Do you want to know how to post a blog on blogger or how to publish a blog on the internet. Hi, my name is Suraj Bhaskar and today I am going to share you, how to create a new post in blogger. So you must read this article now.

In the previous post I had discussed how to create a blog inblogger. Now we are going to create new posts for our brand new blog. Creating a post is not so hard. It is like writing some lines related to your niche. You must write fresh and unique content because Google likes a fresh and unique contents and they give you higher rank on Google SERP. You may have listen about it also:
Content is the king
So you have to write unique and fantastic posts for your blog. I suggest you to go thorough in your post niche. Now let’s start and create a new post for your blog.
Step 1: Click on “New Post” to go into the writing area.

create-new-post-on-blogger


Step 2: Write a Post Title. I suggest you to add some special words in the title to get more clicks. Here are they: - “Now”, “Try”, “Free” and also include the years.

create-new-post-on-blogger


Read also box

Step 3: Write your post in text area. Make sure you’re in the “Compose” side of dashboard.
·         If you know how to edit HTML, you can work in the HTML section.

Step 4: When you have written your post, click on post settings to do some changes like adding Labels, editing permalink etc.

create=new-post-in-blogger


Step 5: Now if you click on “Save” button, it will save your post in drafts and if you want to see preview of your newly created post click on “Preview” button. When you’ve done everything just hit on “Publish” button to publish your article on the WWW.

Now anyone can see your post and comment on it. You can also share your post links to show your friends and relatives. You can publish unlimited posts and share your knowledge and thoughts in all over the world.

Read also box
How to edit permalink in blogger post

How to enable search description in blogger

I hope this guide would be helpful for you. If you have any question about this topic, please let’s know in the comment section below.
And also if you found this article helpful and useful, share this post with your friends and family. Good bye.
January 10, 2018

How to create a blog on blogger for free


how-to-create-a-new-blog-with-blogger


Do you want to know how to create a blog for free and make money or how to create your blog. Hi, my name is Suraj Bhaskar and today I am going to share you how to create your own blog for free. So you must read this article now.

Starting a blog with blogger is so easy and in this tutorial I will show you, how you can easily start your own blog with blogger. You can start a blog in just 7 easy steps. So here are the steps:

Step 1: Just go to Blogger

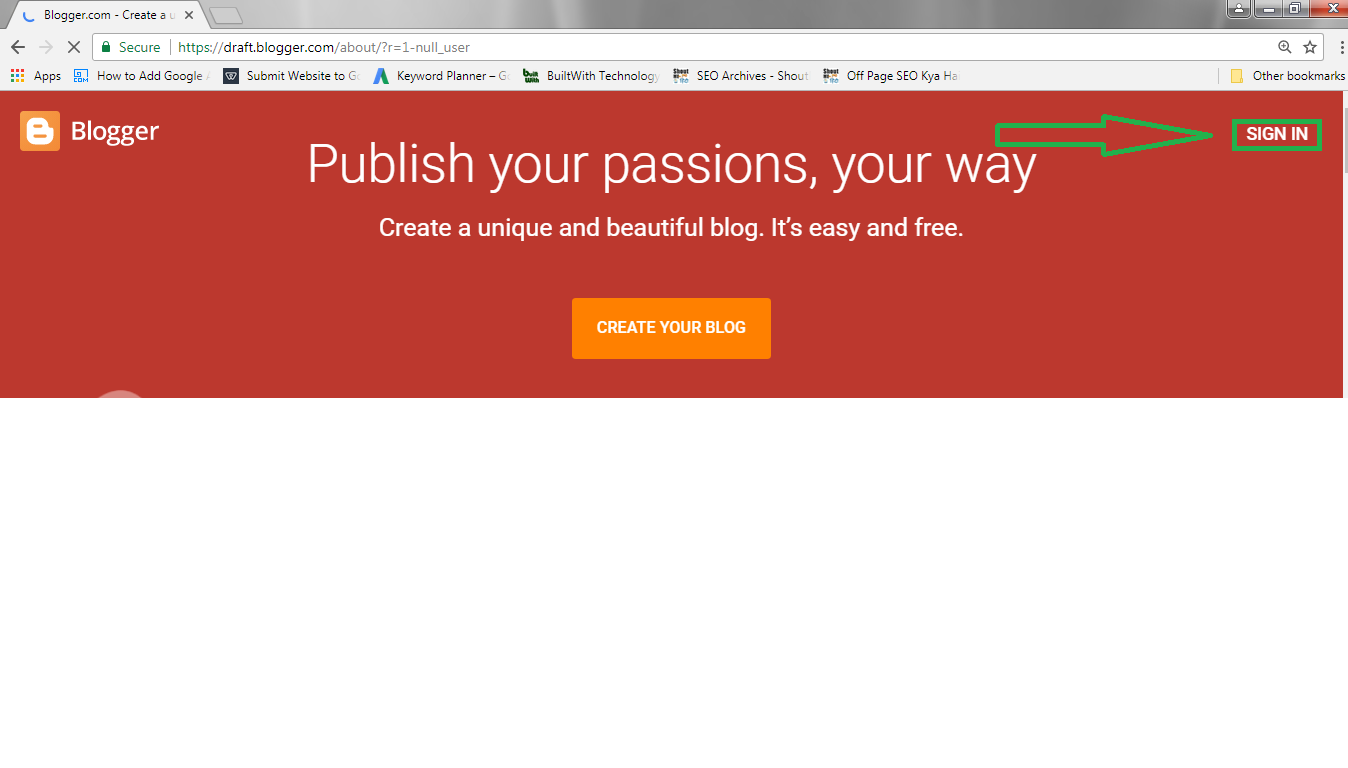
Step 2: Click on “Sign In”. You can see this button in the upper right corner of the window. Now you have to enter your Google username and password. If you don’t have a Google account, you should create a Google account first.

how-to-create-a-blog-on-blogger


Step 3: Click on “Create New Blog” to start your blog.

Step 4: Type a fine title for your blog. You should choose a unique and stylish title for your blog because it will help you to ranking on Google and also while choosing a domain name for your blog.

how-to-create-a-blog-on-blogger


Step 5: Enter a URL for your blog. This is the most important part while starting a blog on blogger because you have to enter a unique URL which no one owns in the whole WWW. Because if anyone has already chosen the same URL which you entered, blogger will show “This blog address is not available”. So you have to choose a unique URL for your blog which is available and Click Continue. You can use alphabet and numbers for you blog URL.

URL of your blog is a very important factor in SEO

Step 6: Now you have to choose a simple template. This is the basic design and layout of your blogger blog. I suggest you to choose any of them because we can change them further.

Step 7: Now finally click on “Create Blog” button to complete the process and start your own blog with blogger.

how-to-create-a-blog-on-blogspot


Now you have successfully created your blog with blogger in just 7 easy steps. Let’s visit the blogger dashboard to know more.

create-a-new-blog-with-blogger


·         Now click on “Theme” button. This section allows you to customize the look of your blog. It contains all elements of the template. Here you will see two options for customization. You can customize your blog in “Customize” section and if you know editing HTML then click on “Edit HTML”.

·         For all necessary settings, you can visit “Settings” section.
·         Click on States Section to check your page views and many more.
·         Click on “Comments” section to view the comments from reader of your blog post.
·         Click on “Layout” section to customize the basic look of your blog.

Now you must read these posts to know more:
·         How to create a blog post in blogger
·         How to create necessary pages in blogger

·       
I hope this guide would be helpful for you. If you have any question about this topic, please let’s know in the comment section below.
And also if you found this article helpful and useful, share this post with your friends and family. Good bye.

Sunday, 24 December 2017

December 24, 2017

What is SEO?

what-is-search-engine-optimization


What is SEO

SEO is short form of Search Engine Optimization. It is a process of designing and optimizing a website for search engines. It is very helpful in ranking on any search engines and achieving the SERP. It is also used to gain the amount of visitors to a website by getting a high-ranking place in the search engine result pages (SERP).

Search-engine-optimization
search engine optimization techniques,

Because as much as a website ranks organic in search results the greater the chance to gain more visitors and get higher rank in all search engines. SEO helps to ensure that the website is accessible to the search engines and improve the ranking.

search engine optimization tools,


SEO increases the CTR (Click Through Rate) of the website. So, every webmaster use all SEO techniques to rank higher on all search engines. Thus, it actually increase the quality of traffic and also the websites by getting rank in organic search engine results.
December 24, 2017

Difference between “search engine” and “portal”.

difference-between-search-engine-and-portal

Difference between “search engine” and “portal"

Search Engine

all-search-engines

Google, Bing, Yandex, Yahoo etc. are search engines. They index millions of websites on the web. When we search on internet through any browser then browser uses search engines to find the content we want.  So, search engine is a program that searches and identifies contents that related to keyword given by the user on the World Wide Web.

It helps user to find the desired information. It allows us to input any specific keyword or phrases and shows a list of items or content which match those keywords.


Portal

an-example-of-portal


Some of the most popular portals available on the World Wide Web are facebook.com, gmail.com and twitter.com. Portal is smaller than search engines. Portal is a private location on the internet. It is like a point of access to the information available on the World Wide Web. 
December 24, 2017

What is Domain Name?

what-is-domain-name

What is domain name ?


Domain name is the identity of one or more IP addresses on the internet. For example WWW.google.com points to the IP address “74.125.127.147” which is not easy to remember. Because we can easily remember any name instead of a long string of numbers. That’s way the domain names hide the technical IP address of the websites in which most viewers are not interested.


·       
  A domain name cannot be more than 63 characters (excluding .com, .in, .net etc.).
·         The minimum length of a domain name is one character (excluding .com, .in, .net etc.).
·         Level of domains are separated by “dots (.)”.
4     E.g.:-

  • “www.google.com”
  • “https:” is a protocol
  • “www.”  Is a subdomain
  • “google” is a mid-level domain
  • “.com” is a top level domain

December 24, 2017

What is WWW? WWW in "Internet".

what-is-world-wide-web


What is “WWW”?

world wide web inventor

WWW stands for World Wide Web. WWW was designed by Tim Berners-Lee in 1991. It is actually different from the internet because internet is a network connection which enables users to access the WWW. It is like a huge electronic book whose pages are stored on multiple servers in all over the world. All pages are connected through links which we call “hypertext” or “hyperlinks”.
We access those pages through the internet.


        We can access any desired pages or information by hypertext. So it is like a huge online network of many pieces of information which includes web pages, photos, videos, audios and other online content. These all contents are created in HTML and can be access via HTTP.


Saturday, 4 November 2017

November 04, 2017

How to bypass Applock password in android


how-to-bypass-applock-password-in-android


In this tutorial I am going to show you how to bypass Applock in android. Though AppLock security is very tight but still you can bypass it easily in certain conditions. This guide will help you to unlock app lock in your phone when you don't know the password.

1. Uninstall AppLock One of the best way to unlock password protected apps in your phone is to uninstall AppLock. If there will be no AppLock, so no password is required and thus you can open any application directly. Here's a step-by-step guide to uninstall it -
1. First go to Settings and click Apps option.
2. Now move under the Downloaded tab and click AppLock.
3. Next tap the Uninstall button and click OK to continue. That's it.
Wait! There is a little problem. AppLock is now mature enough to prevent itself from being uninstalled by someone. In latest version, users have to give it
administrative rights in their phone so that no one can uninstall it without password.
You can bypass this protection by removing AppLock from device administrator. Simply go to "Settings → Security → Device Administrators" and uncheck the button next to the AppLock option. Now you can uninstall it easily.
There is another common problem you might face while uninstalling AppLock. Sometimes phone's Settings is locked. In that case, you can try these methods -
Uninstall it from app drawer - Long press the AppLock icon in the app drawer and then click Uninstall option.
Use third-party tool - You can also uninstall it by using third-party apps like Easy Uninstaller. If Google Play Store is also locked, you can download them from other app stores.
Ideal case: If phone Settings is locked,
AppLock icon is hidden and you have given it administrative rights in your phone, then there is no way to uninstall it without password. Sorry!
Also read: How to prevent AppLock from being uninstalled.

2. Force stop AppLock

As like other Android applications, AppLock and its services are always running in the background to monitor other apps usage. If you will force stop it, all applications will be unlocked automatically and good thing is, you can continue to use AppLock without uninstalling it.
Steps are almost same as in above method. First go to "Settings → Apps → Downloaded → AppLock". Now tap the Force Stop button and click OK to continue. Again if AppLock is a device administrator, then remove it first. Unfortunately, this method will not work if phone Settings is locked.

3. Disable app usage access

In Android 5.0 and later versions, you must permit usage access for AppLock to work properly. This will help it to collect general information about the apps, such as how often you use them. If you will disable this usage access, it won't work and all the apps will be unlocked without password.
All you have to do is, go to "Settings → Security → Apps with usage access (Under Advanced section)". Now switch off the button next to the AppLock option. That's it.

4. Reset password

If above methods doesn't work, then the only option you're left with is to reset the password. There are two choices available. Either you can send the code on your security email or give answer to the security questions. Follow these steps to reset the password -
Open AppLock and when the lock screen appears, tap the menu button (three dots at the top-right corner). Then click "Forget password " option. Now send the code to your security email (which needs an active Internet connection) or give answer to the security questions offline.
These are 4 easy methods to unlock password protected apps in your Android phone.

Sunday, 22 October 2017

October 22, 2017

Stylish Sitemap for Blogger Blog


how-to-create-sitemap-page-for-blogger-blog


Hi guys in this tutorial, I will show you how to create a sitemap page for your blogger blog. First of all you should understand what is a sitemap page. A sitemap (site map) is a bunch of web pages that collected and list them by categories and drop them by the date that planed by your designation and it accessible to crawlers or users. Sitemap is a table of your website/blog contents which listed with links direct to your selection web pages. The sitemap is allowed users be easy to find the navigation that they are looking for from you website/blog.
You may visit our sitemap page for better understanding.

How to create a Sitemap Page for blogger

There are many methods to create a sitemap for website/blog, it can create by HTML and XML format language that will describe your website contents. I will show you a simple HTML sitemap page which is very easy to understand and looks nice. So follow these steps below and create sitemap page for your own blog:

Read also: how to create sitemap for wordpress website


Step 1

Login your blogger dashboard and select your blog.

Step 2

Go to "pages"  > click the "New Page" button.

Step 3

Click on the HTML tab
sitemap-page-for-blogger-blog
and paste the following code inside the empty box like this.

sitemap-page-for-blogger-blog

here is the code:

<style>
p.labels a{color: #242424; text-transform: uppercase;font-size: 15px;}
a.post-titles {color: #0000FF;}
ol li{list-style-type:decimal;line-height:25px;}
</style>
<script>
//<![CDATA[
var postTitle=new Array();var postUrl=new Array();var postPublished=new Array();var postDate=new Array();var postLabels=new Array();var postRecent=new Array();var sortBy="titleasc";var tocLoaded=false;var numChars=250;var postFilter="";var numberfeed=0;function bloggersitemap(a){function b(){if("entry" in a.feed){var d=a.feed.entry.length;numberfeed=d;ii=0;for(var h=0;h<d;h++){var n=a.feed.entry[h];var e=n.title.$t;var m=n.published.$t.substring(0,10);var j;for(var g=0;g<n.link.length;g++){if(n.link[g].rel=="alternate"){j=n.link[g].href;break}}var o="";for(var g=0;g<n.link.length;g++){if(n.link[g].rel=="enclosure"){o=n.link[g].href;break}}var c="";if("category" in n){for(var g=0;g<n.category.length;g++){c=n.category[g].term;var f=c.lastIndexOf(";");if(f!=-1){c=c.substring(0,f)}postLabels[ii]=c;postTitle[ii]=e;postDate[ii]=m;postUrl[ii]=j;postPublished[ii]=o;if(h<10){postRecent[ii]=true}else{postRecent[ii]=false}ii=ii+1}}}}}b();sortBy="titleasc";sortPosts(sortBy);sortlabel();tocLoaded=true;displayToc2();document.write('</br><div class="sitemap-link"><a href="http://helplogger.blogspot.com/2013/12/add-sitemap-table-of-contents-to-blogger.html" style="font-size: 10px; text-decoration:none; color: #5146CD;">Get This Widget</a></div>')}function filterPosts(a){scroll(0,0);postFilter=a;displayToc(postFilter)}function allPosts(){sortlabel();postFilter="";displayToc(postFilter)}function sortPosts(d){function c(e,g){var f=postTitle[e];postTitle[e]=postTitle[g];postTitle[g]=f;var f=postDate[e];postDate[e]=postDate[g];postDate[g]=f;var f=postUrl[e];postUrl[e]=postUrl[g];postUrl[g]=f;var f=postLabels[e];postLabels[e]=postLabels[g];postLabels[g]=f;var f=postPublished[e];postPublished[e]=postPublished[g];postPublished[g]=f;var f=postRecent[e];postRecent[e]=postRecent[g];postRecent[g]=f}for(var b=0;b<postTitle.length-1;b++){for(var a=b+1;a<postTitle.length;a++){if(d=="titleasc"){if(postTitle[b]>postTitle[a]){c(b,a)}}if(d=="titledesc"){if(postTitle[b]<postTitle[a]){c(b,a)}}if(d=="dateoldest"){if(postDate[b]>postDate[a]){c(b,a)}}if(d=="datenewest"){if(postDate[b]<postDate[a]){c(b,a)}}if(d=="orderlabel"){if(postLabels[b]>postLabels[a]){c(b,a)}}}}}function sortlabel(){sortBy="orderlabel";sortPosts(sortBy);var a=0;var b=0;while(b<postTitle.length){temp1=postLabels[b];firsti=a;do{a=a+1}while(postLabels[a]==temp1);b=a;sortPosts2(firsti,a);if(b>postTitle.length){break}}}function sortPosts2(d,c){function e(f,h){var g=postTitle[f];postTitle[f]=postTitle[h];postTitle[h]=g;var g=postDate[f];postDate[f]=postDate[h];postDate[h]=g;var g=postUrl[f];postUrl[f]=postUrl[h];postUrl[h]=g;var g=postLabels[f];postLabels[f]=postLabels[h];postLabels[h]=g;var g=postPublished[f];postPublished[f]=postPublished[h];postPublished[h]=g;var g=postRecent[f];postRecent[f]=postRecent[h];postRecent[h]=g}for(var b=d;b<c-1;b++){for(var a=b+1;a<c;a++){if(postTitle[b]>postTitle[a]){e(b,a)}}}}function displayToc(a){var l=0;var h="";var e="Post Title";var m="Click to sort by title";var d="Date";var k="Click to sort by date";var c="Category";var j="";if(sortBy=="titleasc"){m+=" (descending)";k+=" (newest first)"}if(sortBy=="titledesc"){m+=" (ascending)";k+=" (newest first)"}if(sortBy=="dateoldest"){m+=" (ascending)";k+=" (newest first)"}if(sortBy=="datenewest"){m+=" (ascending)";k+=" (oldest first)"}if(postFilter!=""){j="Click to view all"}h+="<table>";h+="<tr>";h+='<td class="header1">';h+='<a href="javascript:toggleTitleSort();" title="'+m+'">'+e+"</a>";h+="</td>";h+='<td class="header2">';h+='<a href="javascript:toggleDateSort();" title="'+k+'">'+d+"</a>";h+="</td>";h+='<td class="header3">';h+='<a href="javascript:allPosts();" title="'+j+'">'+c+"</a>";h+="</td>";h+='<td class="header4">';h+="Read all";h+="</td>";h+="</tr>";for(var g=0;g<postTitle.length;g++){if(a==""){h+='<tr><td class="entry1"><a href="'+postUrl[g]+'">'+postTitle[g]+'</a></td><td class="entry2">'+postDate[g]+'</td><td class="entry3">'+postLabels[g]+'</td><td class="entry4"><a href="'+postPublished[g]+'">Read</a></td></tr>';l++}else{z=postLabels[g].lastIndexOf(a);if(z!=-1){h+='<tr><td class="entry1"><a href="'+postUrl[g]+'">'+postTitle[g]+'</a></td><td class="entry2">'+postDate[g]+'</td><td class="entry3">'+postLabels[g]+'</td><td class="entry4"><a href="'+postPublished[g]+'">Read</a></td></tr>';l++}}}h+="</table>";if(l==postTitle.length){var f='<span class="toc-note">Show All '+postTitle.length+" Posts<br/></span>"}else{var f='<span class="toc-note">Show '+l+" posts by category '";f+=postFilter+"' the "+postTitle.length+" Total Posts<br/></span>"}var b=document.getElementById("toc");b.innerHTML=f+h}function displayToc2(){var a=0;var b=0;while(b<postTitle.length){temp1=postLabels[b];document.write("<p/>");document.write('<p class="labels"><a href="/search/label/'+temp1+'">'+temp1+"</a></p><ol>");firsti=a;do{document.write("<li>");document.write('<a class="post-titles" href="'+postUrl[a]+'">'+postTitle[a]+"</a>");if(postRecent[a]==true){document.write(' - <strong><span style="color: rgb(255, 0, 0);">New!</span></strong>')}document.write("</li>");a=a+1}while(postLabels[a]==temp1);b=a;document.write("</ol>");sortPosts2(firsti,a);if(b>postTitle.length){break}}}function toggleTitleSort(){if(sortBy=="titleasc"){sortBy="titledesc"}else{sortBy="titleasc"}sortPosts(sortBy);displayToc(postFilter)}function toggleDateSort(){if(sortBy=="datenewest"){sortBy="dateoldest"}else{sortBy="datenewest"}sortPosts(sortBy);displayToc(postFilter)}function showToc(){if(tocLoaded){displayToc(postFilter);var a=document.getElementById("toclink")}else{alert("Just wait... TOC is loading")}}function hideToc(){var a=document.getElementById("toc");a.innerHTML="";var b=document.getElementById("toclink");b.innerHTML='<a href="#" onclick="scroll(0,0); showToc(); Effect.toggle(\'toc-result\',\'blind\');">?? Display Table of Contents</a> <img src="https://blogger.googleusercontent.com/img/b/R29vZ2xl/AVvXsEj64NhXnEHf3zPyyLgMxmzXLKR0622LLS58kcBcYLYIQNRMjTyAB14JVBc0SGSjlmLhFSQ_7biGLm3n7BAareCCg2gqWZE_TkyG6bHcXCf1zvWat2iRqbgFr1rw7VtOdXRO6ULoMhrvHWbq/s1600/new_icon.gif"/>'}function looptemp2(){for(var a=0;a<numberfeed;a++){document.write("<br>");document.write('Post Link : <a href="'+postUrl[a]+'">'+postTitle[a]+"</a><br>");document.write('Read all : <a href="'+postPublished[a]+'">'+postTitle[a]+"</a><br>");document.write("<br>")}};
//]]>
</script>
<script src="https://yourblog.blogspot.in/feeds/posts/default?max-results=9999&amp;alt=json-in-script&amp;callback=bloggersitemap"></script>


Step 4

After adding the above code, replace https://yourblog.blogspot.in/  with the address of your blog.

Step 5

Click "Options" on the right side of the post editor and select "Don't Allow, hide existing" for the reader comments.

Read also: how to submit website to Yandex search engine

Step 6

Finally click on the "Publish" button and see the page.


This sitemap will updated automatically as new posts are published.

If you need any help please comment below.

Saturday, 21 October 2017

October 21, 2017

How to charge your android phone faster


how-to-charge-your-android-faster


Hi guys, in this tutorial I will tell you some special tricks to charge your android. These tricks will help you to increase the battery life and also your android phone. Android batteries usually take 2-3 hours to get completely charged. Charging it for few minutes will hardly rise its 1 or 2% only. So below I had shared few essential tips which can boost up the charging speed of your Android phone.

1. Switch off the phone

Turning off the phone can be a good solution to speed up the charging process . The reason is very simple. When the phone is switched off, there will be no battery usage by the screen, apps, Internet and other things. In other words, no discharging will take place and thus no extra battery power will be dissipated.
What I had observed is that, when the phone is off, charging speed will increase by 50% least which means that your phone will be charged completely in less than half the usual time it takes. Another benefit is that, your phone will not overheat while charging. This keeps your phone battery healthy, safe and long-lasting.

read also: MX Player tricks and tips


2. Use Airplane mode

If you don't want to switch off your phone, use Airplane mode instead. Many of you already know about this feature.
Airplane mode simply turn off all wireless transmission functions like Wi-Fi, hotspot, bluetooth , GPS and cellular . In airplane mode, you won't receive any calls, messages and other online notifications. Moreover, you can't access Internet.
Remember that, saving battery life at the time of charging will boost up the charging speed. These functions are the main culprit to reduce battery life. Android device occasionally check for Wi-Fi, cellular and bluetooth signals (if these features are turned on). Moreover, If signals are low, device will try more hard to get good input which will consume more energy. While in airplane mode, your phone will stop communicating with other devices and towers.


3. Avoid USB charging

The average amp input required by most of the Android devices is around 1 amp only, which will charge the battery at normal rate. Many people charge their phone by connecting it with laptop. There are three types of USB ports available at present which are 1.0, 2.0 and 3.0. The amp output of 1.0 and 2.0 USB port is less than 1 amp which charge at very slow rate while it's little more for 3.0 USB port.
Experiment shows that the charging with USB is quite slow in comparison with the direct wall charging. This is because, the
power supply by the wall chargers is much higher than the USB ports and thus battery get charged more faster. Also, you shouldn't use wireless charging when you're in hurry because it also supply less power.

read also: create recycle bin in android

4. Stop useless things

You should turn off all useless things like Wi-Fi, mobile data, NFC, location, bluetooth, GPS and hotspot when they aren't in use. I had seen many people who keep their mobile data turned on every time. All these things are used to send and receive signals which are the worst battery enemy.
Playing games and watching videos are another things which you should avoid. This not only slow down the charging speed but also overheats your phone. You can also decrease the screen brightness to save little battery life. Don't use flashlight and camera for a long time.


5. Don't use your phone while charging

If you're one of those people who always use their phone while charging then, please stop doing this. Turning on the screen every 30 second to check new notification will drain phone battery. Just leave it and let it charge only. Some apps will still work in background even when your phone is locked. They are wasting battery life for no reason.
To solve this problem, you can uninstall all those apps which are no longer in use. I usually check my phone to find such useless applications and uninstall them to free up the memory space. Facebook, Instagram, Flipkart and other news apps are the main culprit. They are wasting battery and using unnecessary data in background. It's better to access their website directly from your primary browser instead of using their app.

6. Use original charger only

If your smartphone charging speed is too slow, it may be due to its faulty charger.
Faulty charger not only supply less power to the battery but also make its life shorter. Never use local chinese chargers to charge your device, even using a different company isn't good. You should use same model and same brand charger only which comes packed with the phone. Now Android phones get hanged when a local charger is plugged into them. If you think that your charger is faulty, replace it (if it's in guarantee) or get a new one.

read also: how to take backup of your installed games and apps

7. Get a new battery or power bank

As like charger, your battery can also be a faulty and it may take more than usual time to get completely charged. After a long use, the internal resistance of battery is increased and due to which, more energy is consumed to overcome this resistance. This increases the discharging and thus, slow down the charging process.


8. Use battery saver mode

 Android Lollipop version has an inbuilt feature to save battery life. This feature is named as battery saver mode. If you've a Sony device, you can use stamina mode as well.

read also: google adsense approval tricks

9. Use safe mode

 You can reboot your Android phone in safe mode which will disable all third-party apps and widgets.


10. Put it in cool place

Putting your Android device in cool place is good to reduce its temperature and thus it will be charged at more faster rate.

If you have any question related to this topic, always feel free to leave your comments below!

October 21, 2017

How to check Google analytics code is implemented successfully or not ?????


how-to-check-google-analytics-in-blogger


Hi guys, in this tutorial I will show you how can you check whether Google analytics code is implemented successfully or not ? If you have implemented google analytics code in your blogger theme and you want to be sure about that, you can check it manually.


Step 1


First of visit any of your blog URL, and right click on anywhere, and select view page source from browser option. Now press CTRL+F(To find codes) and search your analytic ID, like this.

Google-analytics-check-blogger


So if you found your analytic ID, it means you have successfully implemented Google Analytics code.

read also: how to install Google analytics in blogger


Google Analytics Checker

You can check whether it is working or not through this website.